One question we get all the time is: "When are you going to support my tool of choice?" Whether it's a new linting tool, build tool, or framework, the truth is we just can't support everything with a team our size. But we do provide multiple tools to make that integration possible for you.
Today, we're going to walk through integrating Biome, a fast linter and formatter written in Rust, into an Nx workspace. We'll show you how to get started with Biome, apply what you already know about the Node ecosystem, and finally write a plugin that scales for large workspaces with Nx.
Why Biome?
Biome promises to be faster than ESLint and Prettier because it's written in Rust. And hey, who doesn't love using Rust to make things fast?
We're working with a workspace that looks like this: a React application that depends on a few libraries. This workspace is small, but the process we're walking through will scale to any size workspace.

Start with What You Know: Using Biome Without Nx
Before thinking about Nx at all, let's see how far we can get knowing a little bit about Biome and a lot about the Node ecosystem.
Looking at the Biome getting started docs, we need to:
- Install the package:
❯
npm install --save-dev @biomejs/biome
- Create the root configuration using their init command:
❯
npx @biomejs/biome init
This creates a biome.json file at the root of our repo.
- Run the linter:
❯
npx @biomejs/biome lint
Without thinking about Nx at all, we've successfully installed Biome and run a lint across our entire workspace. That's a good starting point, but in a monorepo, we don't want to lint all files all the time. We want to lint individual projects.
Using npm Scripts
Normally, to avoid writing long commands every time, we'd reach for npm scripts. Let's add this to our root package.json:
1{
2  "scripts": {
3    "biome-lint": "biome lint"
4  }
5}
6
Now we can run npm run biome-lint instead. But we're still linting the entire workspace.
Targeting Individual Projects
Since our workspace uses npm workspaces, every project has its own package.json. We can add the same script to individual project package files:
1{
2  "scripts": {
3    "biome-lint": "biome lint"
4  }
5}
6
Now if we move into that directory and run npm run biome-lint, we're only linting that specific directory. When you run biome lint with no other options, it lints that directory and directories below it.
The Nx Integration You Didn't Realize Was There
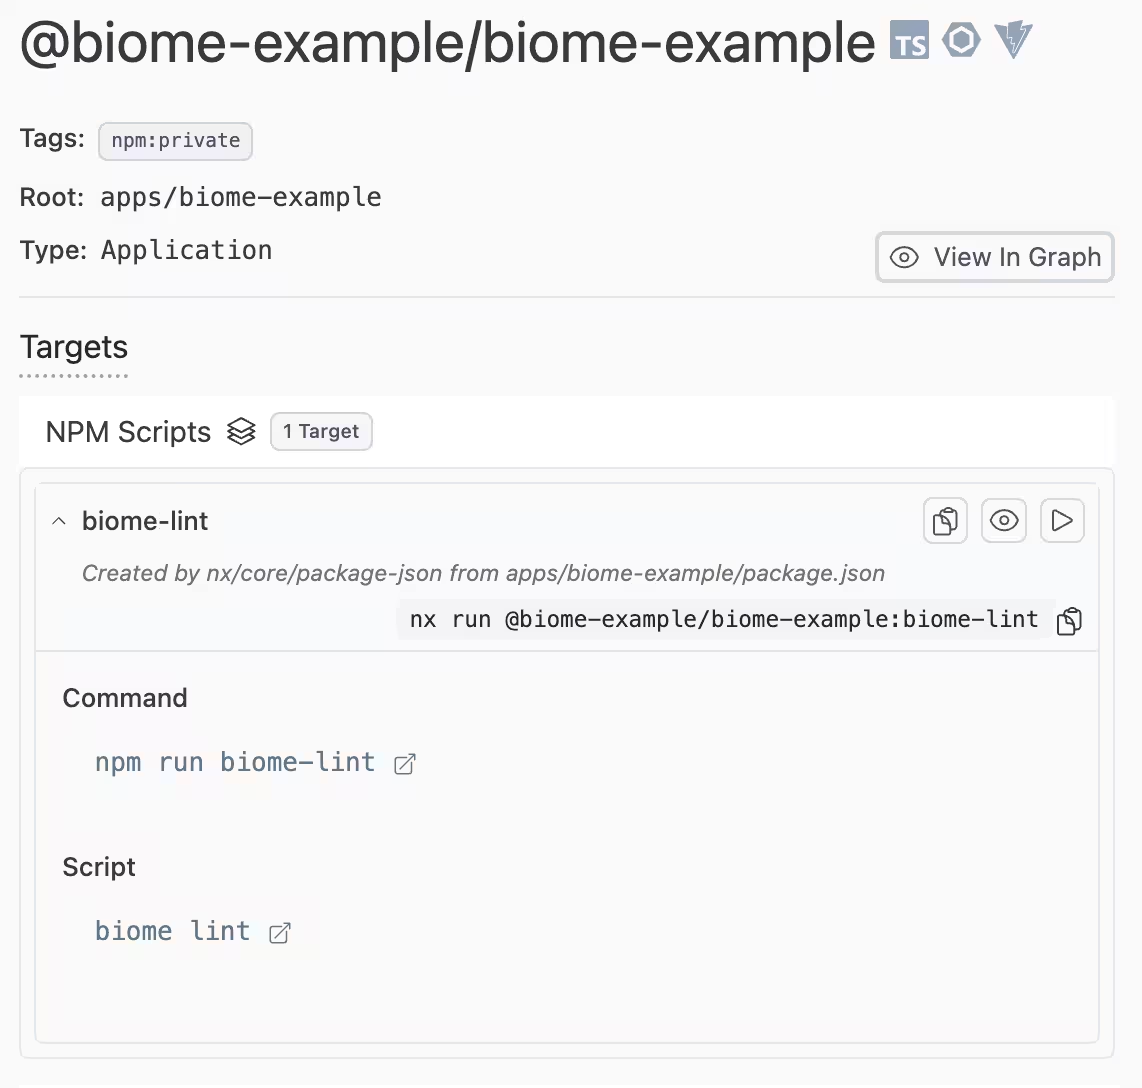
Here's something you might not realize: we've already started an Nx integration. If you open Nx Console, you'll see that biome-lint is available as a target under the "npm scripts" area. Nx automatically incorporates npm scripts into available tasks.

So while npm run biome-lint works, we can also run this through Nx:
❯
npx nx biome-lint biome-example
This gives us the exact same result. We can copy this script to other packages, like our navigation library, and suddenly we can run biome-lint on multiple projects individually.
❯
npx nx run-many -t biome-lint
Hold On, I'm Not Using NPM Workspaces!
While npm workspaces are the default for new Nx workspaces, there's a long history of workspaces created before that. Those workspaces use project.json files for project configuration. While you won't be able to use npm scripts like in npm workspaces, you can still create a target in your project.json files:
1{
2  "targets": {
3    "biome-lint": {
4      "command": "npx @biomejs/biome lint {projectRoot}"
5    }
6  }
7}
8
You'll notice one small difference: {projectRoot} appended to the end of the command. We'll explain this part when we're creating our inferred task plugin later, because this configuration is exactly what you'll be creating as part of the plugin.
Adding Caching Support
One thing missing with this simple setup is caching. Nx doesn't know the biome-lint command is cacheable, and it doesn't know what to cache.
Right now, if we rerun nx biome-lint biome-example twice, it actually runs the lint every time. Ideally, we shouldn't rerun this lint if we haven't changed anything between successful runs.
To configure caching, let's open our nx.json and add target defaults for biome-lint:
1{
2  "targetDefaults": {
3    "biome-lint": {
4      "cache": true,
5      "inputs": [
6        "default",
7        "^default",
8        "{workspaceRoot}/biome.json",
9        {
10          "externalDependencies": ["@biomejs/biome"]
11        }
12      ]
13    }
14  }
15}
16
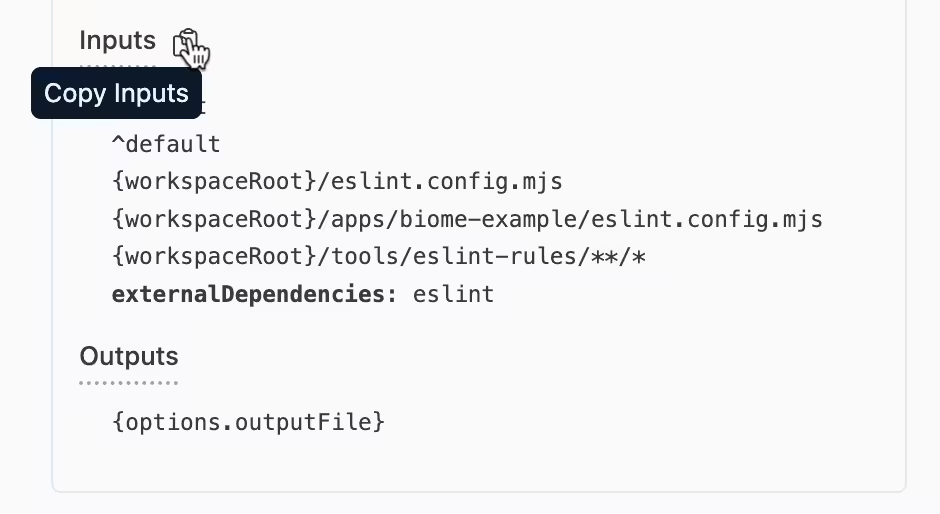
How do we figure out these inputs? Steal them from another linting configuration that we know works. We can copy the inputs from ESLint's configuration using Nx Console. Find a project using eslint and scroll down to the "Inputs" area.

Click the copy button and modify the output for Biome:
- Change
eslint.config.mjstobiome.json - Remove ESLint-specific files we don't need
- Update the external dependency to
@biomejs/biome
Now when we run the task once, it gets cached. Running it a second time will read from cache instead of running again.
Creating an Nx Plugin for Scale
Copying targets to every package would be easy in a small workspace, but this process needs to scale to workspaces with hundreds of packages. Instead, let's create an Nx plugin that uses inferred tasks to create these targets automatically.
An inferred task is created by an Nx plugin by scanning your workspace for particular configuration files and adding targets to projects where it finds those files.
Setting Up the Plugin
First, install the Nx plugin tooling:
❯
npx nx add @nx/plugin
Then generate a new plugin:
❯
npx nx g @nx/plugin:plugin --name=plugin --directory=plugin
This creates a plugin project at the root of our workspace. The important file is plugin/src/index.ts, which we'll fill with our Biome integration logic.
Understanding Plugin Structure
Looking at the Nx docs on extending the project graph, we can find a code example to paste into our index.ts:
1import {
2  CreateNodesContextV2,
3  createNodesFromFiles,
4  CreateNodesV2,
5  readJsonFile,
6} from '@nx/devkit';
7import { dirname } from 'path';
8
9export interface MyPluginOptions {}
10
11export const createNodesV2: CreateNodesV2<MyPluginOptions> = [
12  '**/project.json',
13  async (configFiles, options, context) => {
14    return await createNodesFromFiles(
15      (configFile, options, context) =>
16        createNodesInternal(configFile, options, context),
17      configFiles,
18      options,
19      context
20    );
21  },
22];
23
24async function createNodesInternal(
25  configFilePath: string,
26  options: MyPluginOptions | undefined,
27  context: CreateNodesContextV2
28) {
29  const projectConfiguration = readJsonFile(configFilePath);
30  const root = dirname(configFilePath);
31
32  // Project configuration to be merged into the rest of the Nx configuration
33  return {
34    projects: {
35      [root]: projectConfiguration,
36    },
37  };
38}
39
Let's take this example and make some changes:
1import {
2  CreateNodesContextV2,
3  createNodesFromFiles,
4  CreateNodesV2,
5} from '@nx/devkit';
6import { dirname } from 'path';
7
8export interface MyPluginOptions {}
9
10export const createNodesV2: CreateNodesV2<MyPluginOptions> = [
11  // look for all package.json files in the workspace
12  // (keep this as project.json if you're not using npm workspaces)
13  '**/package.json',
14  async (configFiles, options, context) => {
15    return await createNodesFromFiles(
16      (configFile, options, context) =>
17        createNodesInternal(configFile, options, context),
18      configFiles,
19      options,
20      context
21    );
22  },
23];
24
25async function createNodesInternal(
26  configFilePath: string,
27  options: MyPluginOptions | undefined,
28  context: CreateNodesContextV2
29) {
30  const root = dirname(configFilePath);
31
32  // Project configuration to be merged into the rest of the Nx configuration
33  return {
34    projects: {
35      [root]: {
36        targets: {
37          'biome-lint': {
38            // Nx target syntax to execute a command. More on {projectRoot} below
39            command: 'npx @biomejs/biome lint {projectRoot}',
40            cache: true,
41            inputs: [
42              'default',
43              '^default',
44              '{workspaceRoot}/biome.json',
45              {
46                externalDependencies: ['@biomejs/biome'],
47              },
48            ],
49          },
50        },
51      },
52    },
53  };
54}
55
You can now delete all of the configuration you added to your package.json and nx.json files. Instead, this plugin will search for all of your projects and add the biome-lint target to each project.
Nx executes tasks in the context of the root of the workspace. If you were to just have a command of npx nx @biomejs/biome, it would execute that command in the root of the workspace and lint the entire workspace. {projectRoot} is a special token that will be replaced with the directory of the project you're running against. So now the command will lint the project directory, not the entire workspace.
Key Plugin Concepts
- File pattern: We're looking for
package.jsonfiles (since we're using npm workspaces) - Project root: The directory containing the configuration file
- Command interpolation:
{projectRoot}gets replaced with the actual project path - Caching configuration: Same inputs we defined earlier, now embedded in the plugin
Activating the Plugin
To activate our plugin, add it to the plugins array in nx.json:
1{
2  "plugins": ["@biome-example/plugin"]
3}
4
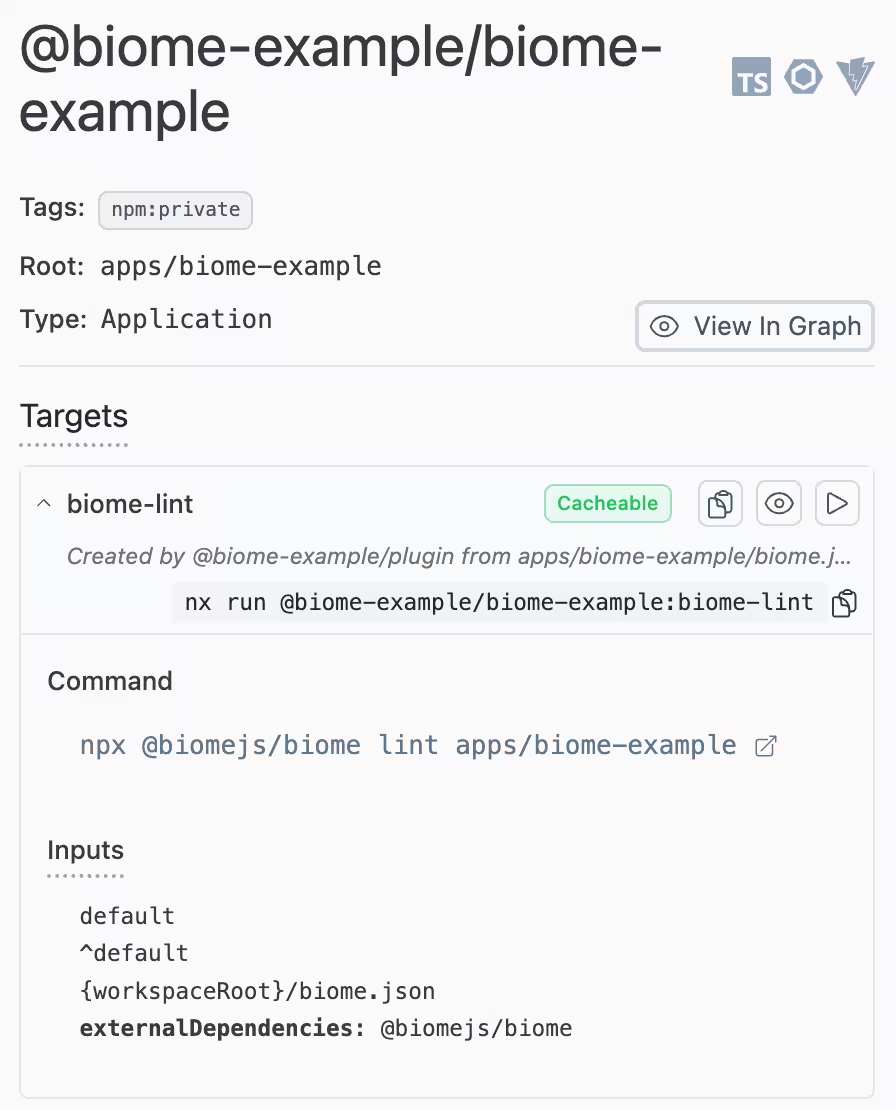
If you open Nx Console, you'll see the biome-lint target is still available, but now it shows "created by @biome-example/plugin."

Selective Application with Configuration Files
Adding Biome to every project might be too aggressive. Most teams want to do a gradual transition where some packages use Biome and others stick with ESLint (especially since Biome doesn't yet support the enforce module boundaries rule).
Using Biome's Nested Config Support
According to Biome's documentation on big projects, we can have multiple biome.json files: one at the root and nested ones in individual packages.
Let's add a biome.json to our biome-example app:
1{
2  "root": false,
3  "extends": "//"
4}
5
This configuration:
- Points to the root configuration with
extends - Allows package-specific rule overrides
- Gives us fine-grained control like we have with ESLint
Updating the Plugin
Now we can modify our plugin to look for biome.json files instead of package.json:
1import {
2  CreateNodesContextV2,
3  createNodesFromFiles,
4  CreateNodesV2,
5} from '@nx/devkit';
6import { dirname } from 'path';
7
8export interface MyPluginOptions {}
9
10export const createNodesV2: CreateNodesV2<MyPluginOptions> = [
11  '**/biome.json',
12  async (configFiles, options, context) => {
13    return await createNodesFromFiles(
14      (configFile, options, context) =>
15        createNodesInternal(configFile, options, context),
16      configFiles,
17      options,
18      context
19    );
20  },
21];
22
23async function createNodesInternal(
24  configFilePath: string,
25  options: MyPluginOptions | undefined,
26  context: CreateNodesContextV2
27) {
28  const root = dirname(configFilePath);
29
30  // because there is also a biome.json at the root of the workspace, we want to ignore that one
31  // return an empty object if we're at the root so that we don't create a root project
32
33  if (root === '.') {
34    return {};
35  }
36
37  // Project configuration to be merged into the rest of the Nx configuration
38  return {
39    projects: {
40      [root]: {
41        targets: {
42          'biome-lint': {
43            command: 'npx @biomejs/biome lint {projectRoot}',
44            cache: true,
45            inputs: [
46              'default',
47              '^default',
48              '{workspaceRoot}/biome.json',
49              {
50                externalDependencies: ['@biomejs/biome'],
51              },
52            ],
53          },
54        },
55      },
56    },
57  };
58}
59
Now the plugin only adds biome-lint targets to projects that have a biome.json file. This enables progressive adoption: teams can opt into Biome by adding configuration files where they want them.
During plugin development, Nx caches plugin compilation. Use NX_DAEMON=false to bypass this cache:
❯
NX_DAEMON=false nx run-many --target=biome-lint
When you're ready for production, run nx reset to clear the cache and the plugin will work normally.
The Power of Custom Plugins
This demonstrates why writing your own plugin is often better than waiting for official support. When the Nx team writes a plugin, we have to account for many different use cases and allow extensive configuration. But you don't have to worry about any of that: you're one team that can run things one way.
Your plugin can be much less complex than anything the Nx team would create because you only need to solve your specific use case.
Expanding Your Plugin
From here, you could add more functionality:
- Generators to create
biome.jsonfiles in new projects - Format commands in addition to linting
- Custom configuration options specific to your organization's needs
Since you already have your own plugin, you can easily extend it without waiting for external support.
Key Takeaways
- Start with what you know - Use your existing ecosystem knowledge before diving into Nx specifics
- Leverage npm scripts integration - Nx automatically picks up package.json scripts as targets
- Add caching incrementally - Start simple, then optimize with proper inputs and outputs
- Build plugins for scale - Manual configuration works for small teams, but plugins scale to hundreds of projects
- Your plugin can be simpler - You don't need to handle every use case like official plugins do
Next Steps
Ready to build your own plugin? Here are some tools to support any tool in your workspace that the Nx team doesn't officially support:
- Check out the Nx plugin documentation
- Join our Discord community for help and to share what you're building
- Share your plugin with the community—others might benefit from your work
Writing Nx plugins isn't as intimidating as it seems. With the same tools we use internally, you can integrate any tool into your Nx workspace. Stop waiting for official support and start building the developer experience your team needs.
Learn more:


